
Preoperative Instructions for Total Knee and Total Hip Replacement Surgery
What is a Joint Replacement?

Hip Joint
Helps with balance and supports your weight
Composed of two bones: pelvis acetabulum and thighbone (femur)
Thighbone (femur) has a rounded head that fits into a socket (acetabulum) to form the hip joint
Hip Replacement
In normal joints, smooth cartilage covers the end of each bone and provides a smooth gliding surface for movement and acts as a cushion between the bones. In osteoarthritis, the most common condition affecting joints, the cartilage wears away and bone rubs against bone causing loss of motion and pain.
With a hip replacement the damaged parts are replaced with components that are made from titanium,
plastic, ceramic and chromium cobalt.
The choice of implants varies from person to person. Your doctor will look at your needs and choose the implant that is best for you.

Knee Joint
Largest joint in the body
Knee joint is where the thigh bone (femur) and the shin bone (tibia) meet
Knee Replacement
Modern knee replacements are made from titanium, chromium cobalt and a polyethylene (plastic). Your doctor will look at your needs and choose the implant that is best for you
Preparing for your Surgery
PRE-OPERATIVE VISIT AT THE PATIENT ASSESSMENT CENTER (P.A.C.)
PAC team
Doctor
Nurse
Occupational Therapist
Pharmacist, if needed
Physiotherapist
Spiritual care, if needed
The Doctor will:
Examine you
Send you for certain tests (e.g. blood test, x-rays, etc.)
The Nurse will:
Review the heath questionnaire
Explain what you need to know in order to help you manage before and after your surgery
Provide you with the disinfectant sponge that you will need to wash with before surgery to decrease the risk of infection
The Physiotherapist will:
Review rehabilitation plans
Notify your local CLSC of your surgery
Request a pre-operative home evaluation (may not be applicable in certain areas)
The PAC team will prepare you for your surgery and answer any questions.
Group teaching session
Nurse, physiotherapist, occupational therapist:
Will review the important information
about your surgery
One or Two Weeks Prior to Surgery
CLSC HOME VISIT
CLSC will contact you to schedule a home visit or phone
evaluation.
If you live in Montreal:
CLSC may do a preoperative home visit
This visit will ensure that your home is appropriate for your return home after your surgery
This visit will help determine the medical equipment you may require. Below are some examples:

Some CLSCs will ask you to rent or purchase equipment prior to your surgery (see equipment suppliers list at the end of this document).
If you do not live in Montreal:
Some CLSCs will ask you to rent or purchase equipment prior to your surgery (see equipment suppliers list at the end of this document)
Home Preparation
Notify your family, caregiver, friends, etc., about your upcoming surgery.
Arrange for transport to and from hospital.
Arrange for meals. Prepare and/ or buy frozen foods in individual portions that can be easily reheated/cooked.
Arrange for help with groceries, bathing, housekeeping, banking, pet care, etc.
Arrange for someone else to provide assistance for the person that you may be caring for at home.
Arrange for someone to be with you for the first couple of nights after you are discharged from hospital.
Notify any support services about your upcoming surgery (CLSC, Meals on Wheels, etc.)
Ensure that medical equipment is properly installed. Familiarize yourself with the equipment.
Clear hallways and spaces around bed, kitchen and bathroom.
Remove rugs, this will allow you to move freely and safely with your walker.
Consider the use of nightlights in hallways etc.
Place items that you will use often within your reach (waist level or shoulder level).
If you do not already have a staircase railing, you may consider installing one.
Consider a hand-held shower head. Make sure you have a good quality, non-slip bath mat in the bathtub and on the bathroom floor.
You may be asked to buy compression stockings. These help to decrease the risk of blood clots.
What time do I Arrive for my Surgery?
You will be admitted to the hospital on the same day of your surgery.
The admitting offce will call you one (1) to two (2) days before to confirm the time you must come to the hospital. Please expect this call and be available.
Your Health Before Your Surgery
If you notice any changes in your health, for example:
Fever
Cough
Sore throat
Skin infection, infected ingrown toenail, etc.
Call your doctor or call the surgery booking office at St. Mary’s hospital before 14:30 (2:30 pm) 514 345-3511 extension 3692 or 3673.
Nutrition Recommendations

In preparation for your surgery and following your surgery, eat a well-balanced diet.
Special emphasis is placed on promoting healing (protein) and preventing constipation (fiber and fluids).
FIBER AND FLUID
Constipation after surgery is common due to the side effects of medications, anesthesia and decreased movement. Include foods that contain dietary fiber and drink plenty of fluids to help keep bowel movements regular and prevent constipation. Increase dietary fiber in your diet.
Common sources include: vegetables, fruits, legumes (beans), whole grains (i.e. brown rice and quinoa), whole grain breads and pasta, unsalted nuts and seeds
Protein
Protein is the most important nutrient for muscle growth and wound healing. High-quality protein is found in Milk & Milk Products and Meat & Alternates groups. Choose lean or low fat options more often.
Common sources include: eggs, cheese, cottage cheese, nuts and seeds, legumes (beans), tofu, fish, meat, milk
Calcium
Calcium is needed for bone healing and maintenance. Milk and milk products are the best source of easily absorbable calcium. Choose low fat or skimmed versions. Aim for 3-4 servings daily.
Common sources include: milk, cheese, sardines (soft bones), yogurt, cottage cheese, frozen yogurt or ice cream, tofu, canned salmon (soft bones)
Vitamin D
Vitamin D is essential for calcium absorption. This vitamin is made in the skin when it is exposed to sunlight. Canada’s Food Guide recommends that adults over 50 consume a daily vitamin D supplement.
The best food sources of Vitamin D include: fatty fish (salmon and mackerel), margarine, milk, fish liver oils
Iron
Iron is a mineral that is needed to carry oxygen to all cells in the body. Enough iron is needed before and after surgery to prevent anemia due to blood loss. It can be better absorbed if eaten with vitamin C-rich foods like oranges and peppers or other sources of heme iron. Iron in foods come in two forms:
Heme iron is found in meat, poultry, and seafood. This iron is the most easily absorbed by the body.
Non-heme iron is found in plant foods like vegetables and legumes. This form of iron is less well absorbed.
Evening Before Surgery
Pack your Overnight Bag
Bring:
Toiletries (soap, toothpaste, toothbrush, denture case, etc.)
Closed heel non-slip shoes/slippers
Underwear, socks, short robe,comfortable/weather appropriate clothing (for your discharge home)
CPAP machine, hearing aid, glasses, compression stockings
Your medications in their original containers
If you are taking blood thinners, like Coumadin, please write down the name of the doctor and phone number of the doctor that follows you for this medication. Bring the doctor’s name and phone number to the hospital
Do not bring:
Valuables
Jewelry
Credit cards
Large sums of money
Surgery Preparation Checklist
The Evening Before Surgery
Shower with the disinfectant sponge provided by the hospital. Wash body from neck to toes, including back. Wash hair with shampoo.
DO NOT eat after midnight.
You can drink clear liquids such as water, fruit juice (no pulp), Gatorade, black coffee (no milk), black tea (no milk) up until 4:00 AM the day of your surgery.
The Day of Surgery
Take a second shower with the disinfectant sponge provided by the hospital. Wash body from neck to toes, including back. Wash hair with shampoo.
DO NOT apply any makeup, nail polish, deodorants, lotions, perfumes, hair products.
Take only the medications that your doctor instructed you to take.
At the Hospital
Day of your Surgery
Please present yourself at the Admitting offce (Main Pavilion, Ground Floor, Room G-310).
You will be directed to the Surgical Day Center (Main Pavilion, 2nd floor, Room 2324).
You will be asked to change into a hospital gown and the nurse will go over a preoperative checklist with you.
The nurse may administer some medications that your doctor may have prescribed for pain and nausea before surgery.
An orderly will walk with you to the operating room. Family members will not be allowed to accompany you.
An anesthesiologist will discuss your anesthesia with you.
After Surgery
In the recovery room, the nurse will monitor you.
You will have:
Intravenous for fluid
Surgical dressing covering your operated site (hip/ knee)
You may have:
Oxygen through a nose piece or mask
Urinary catheter
Compression stockings on your legs
Pain control:
Epidural (in your back)
Nerve Block (in your groin/ thigh)
Patient controlled analgesia (a button that you press for pain medication through IV)
Medication pills
Transfer to Post-Operative Care Unit
You must ask for pain medication as soon as you feel the need
You must do your respiratory exercises every hour (incentive inspirometer)
You must do your circulatory exercises every hour
You must change position in your bed every two (2) hours (prevent pressure ulcers)
You may be allowed to sit at the edge of the bed, or pivot into a recliner (nurse evaluation required)
Until You Go Home
You must ask for pain medication as soon as you feel the need
You must do your respiratory exercises every hour (incentive inspirometer)
You must do your circulatory exercises every hour
You must walk with a walker and with the assistance of a healthcare professional
You must do your exercise program three (3) times a day
You must walk to the bathroom with assistance to wash yourself
You must prepare for your discharge home two (2) to three (3) days after your surgery

Paths to Home Guide
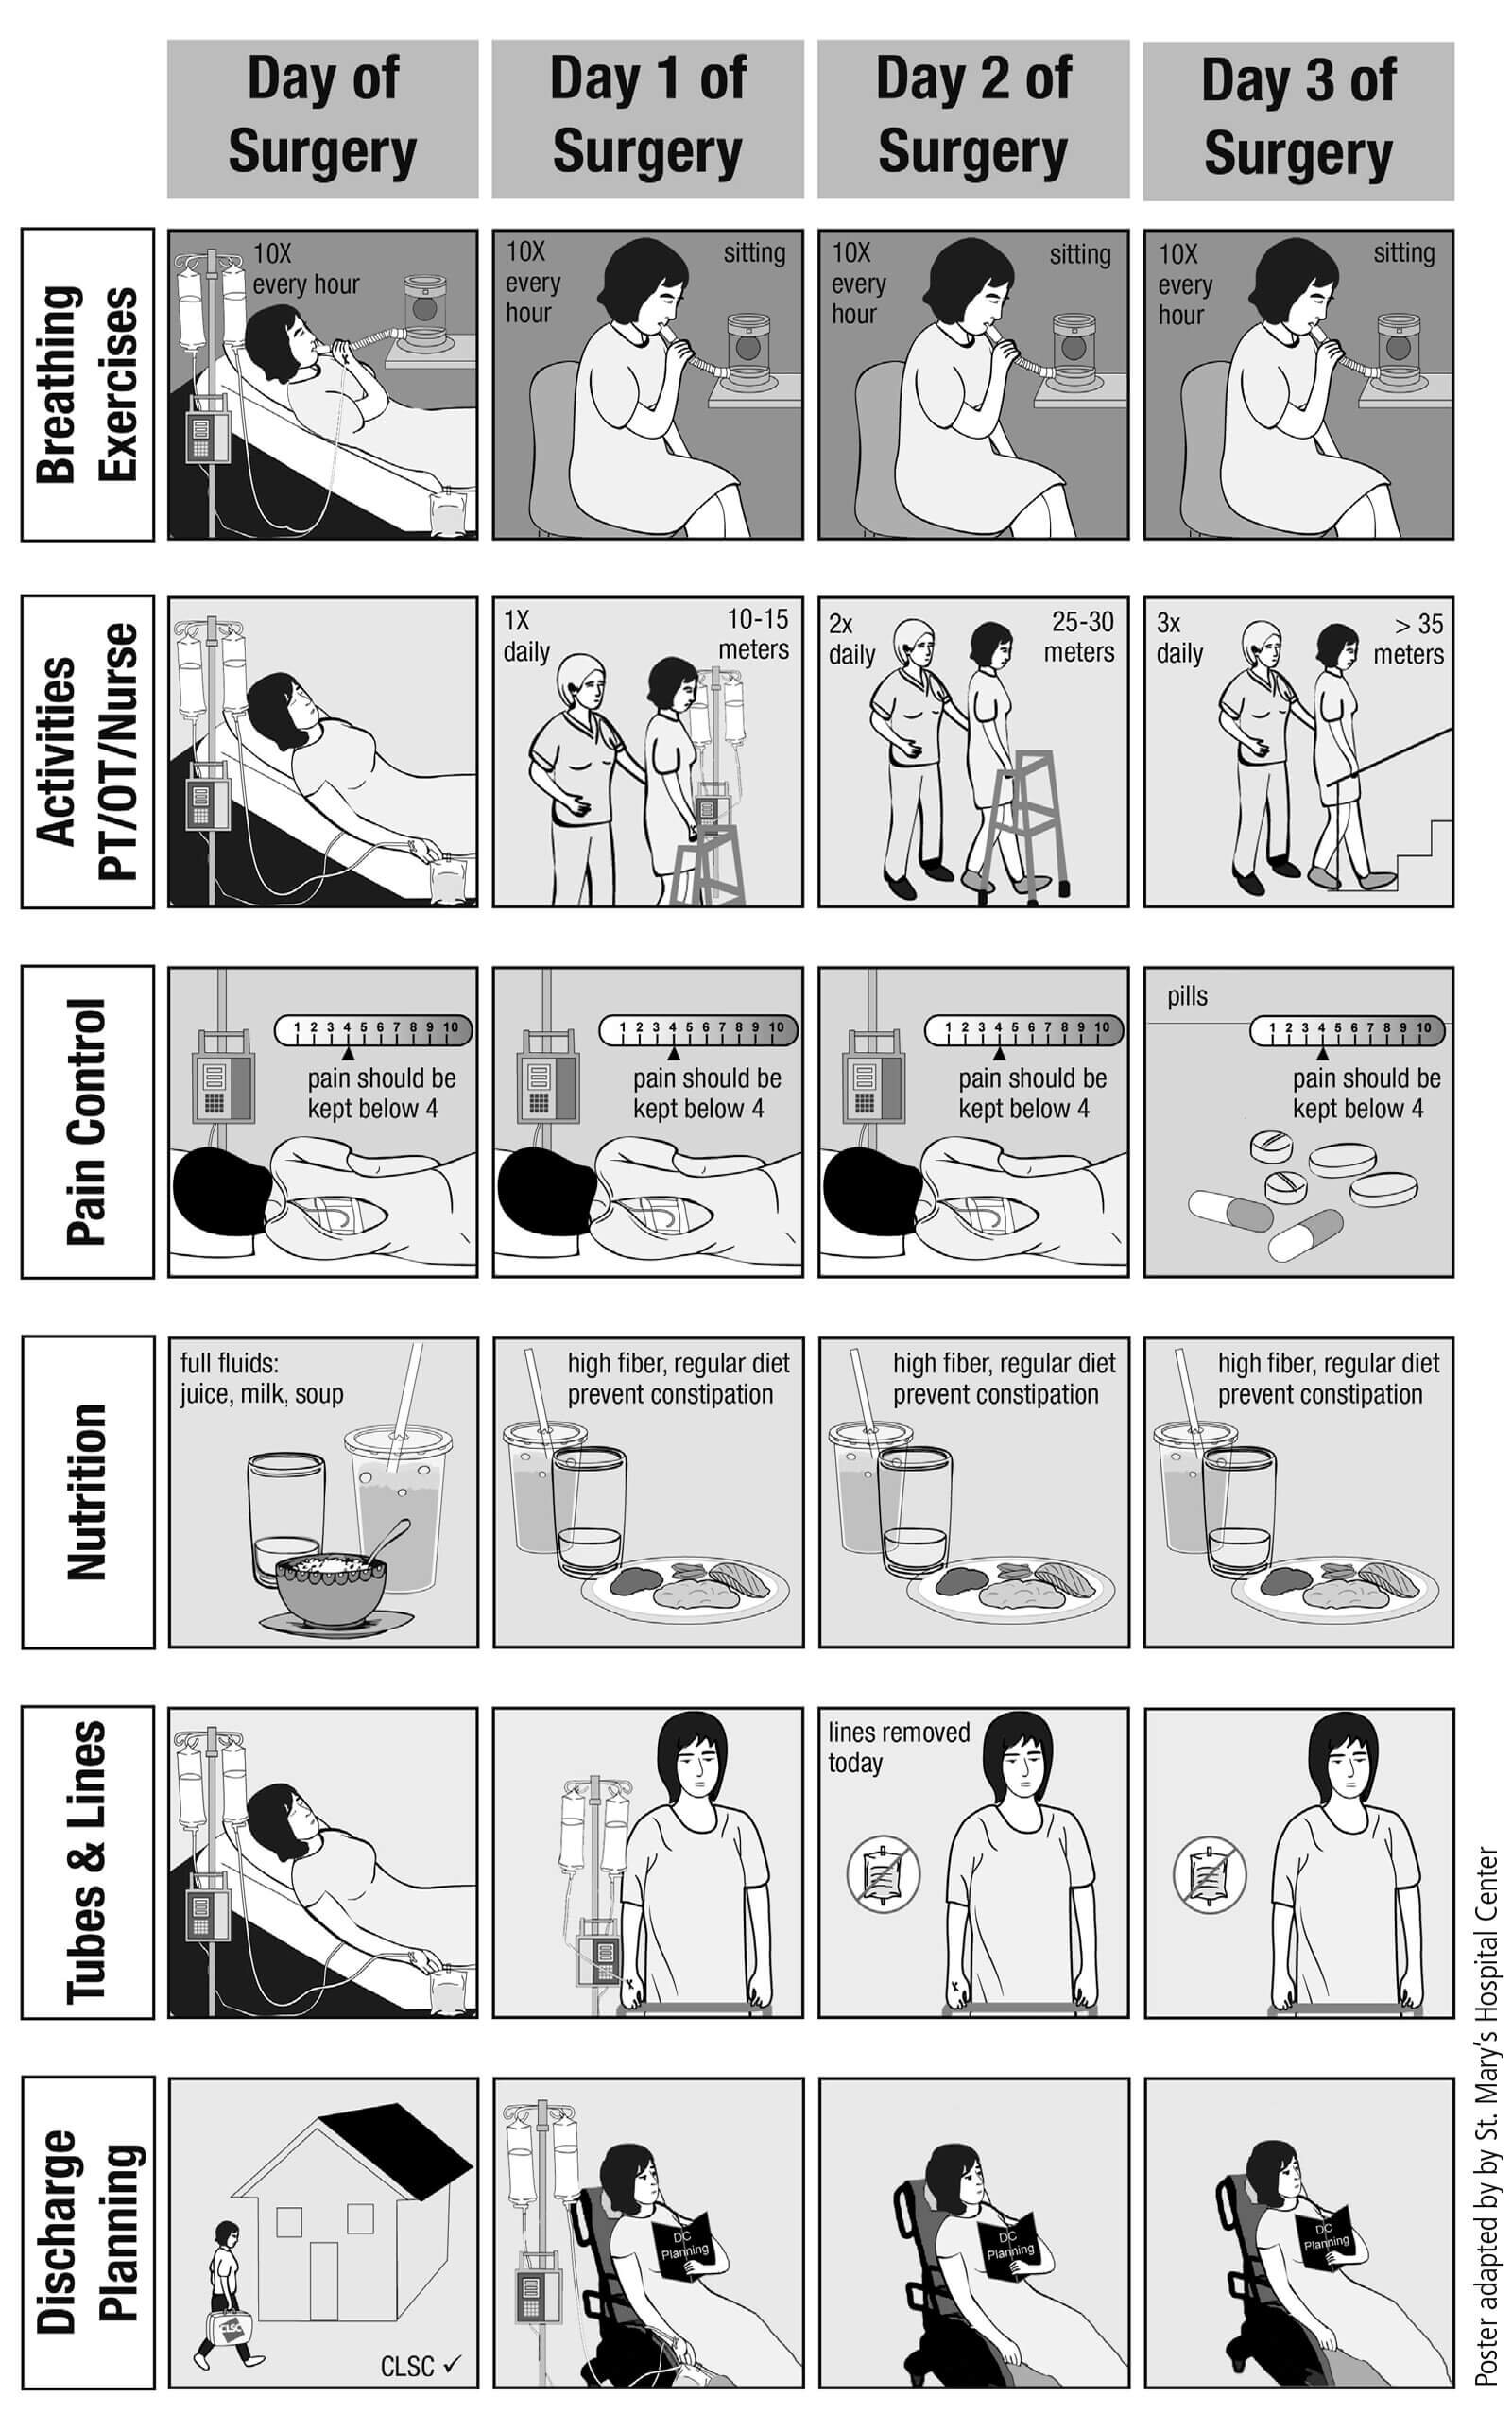
Rehabilitation
It is critical to understand that motivation and participation in your physical therapy program is a vital element in the success of your overall recovery. The more committed and enthusiastic you are, the quicker your improvement will be. Remember, you make the difference!
Day 0 (Surgery Day)
Start ankle pump exercises.
Quad sets-controlling the thigh muscle to push the knee straight.
We will help you sit at the edge of the bed.
You will get up for the first time with the help of a healthcare professional and a walker. You may put as much weight as you can tolerate on your operated leg (unless) otherwise indicated by your doctor.
Wait until Day 1 to start bending your operated knee.
Day 1
Begin your exercice program
Practice your transfers (bed, chair, toilet)
Practice walking for a minimum of 10 meters
Get up for lunch and supper
Practice walking in your room
Day 2/3
We will teach you how to become more independent in your transfers and your daily activities. If all is well, you will be discharged from the hospital.
Continue your exercise program.
Practice your transfers (bed, chair, tub/shower, toilet seat, car).
Practice going up and down the stairs.
You will get up for the frst time with the help of a healthcare professional and a walker. You
may put as much weight as you can tolerate on your operated leg (unless) otherwise indicated by your doctor.Wait until Day 1 to start bending your operated knee.
Discharge Criteria
Your discharge will be on DAY 2 or 3 if the healthcare team determines that you have met the following criteria:
Safe with transfers and walking with walker
Independent with your exercise program
Safe using the stairs
Safe to take your medication
When Ready for Discharge Home
The hospital liaison nurse will contact the CLSC to inform them of:
Discharge date
Dressing changes to incision (if applicable
Removal of staples to incision (if applicable)
Medication administration (if applicable)
The frequency of home visits will be decided by the CLSC.
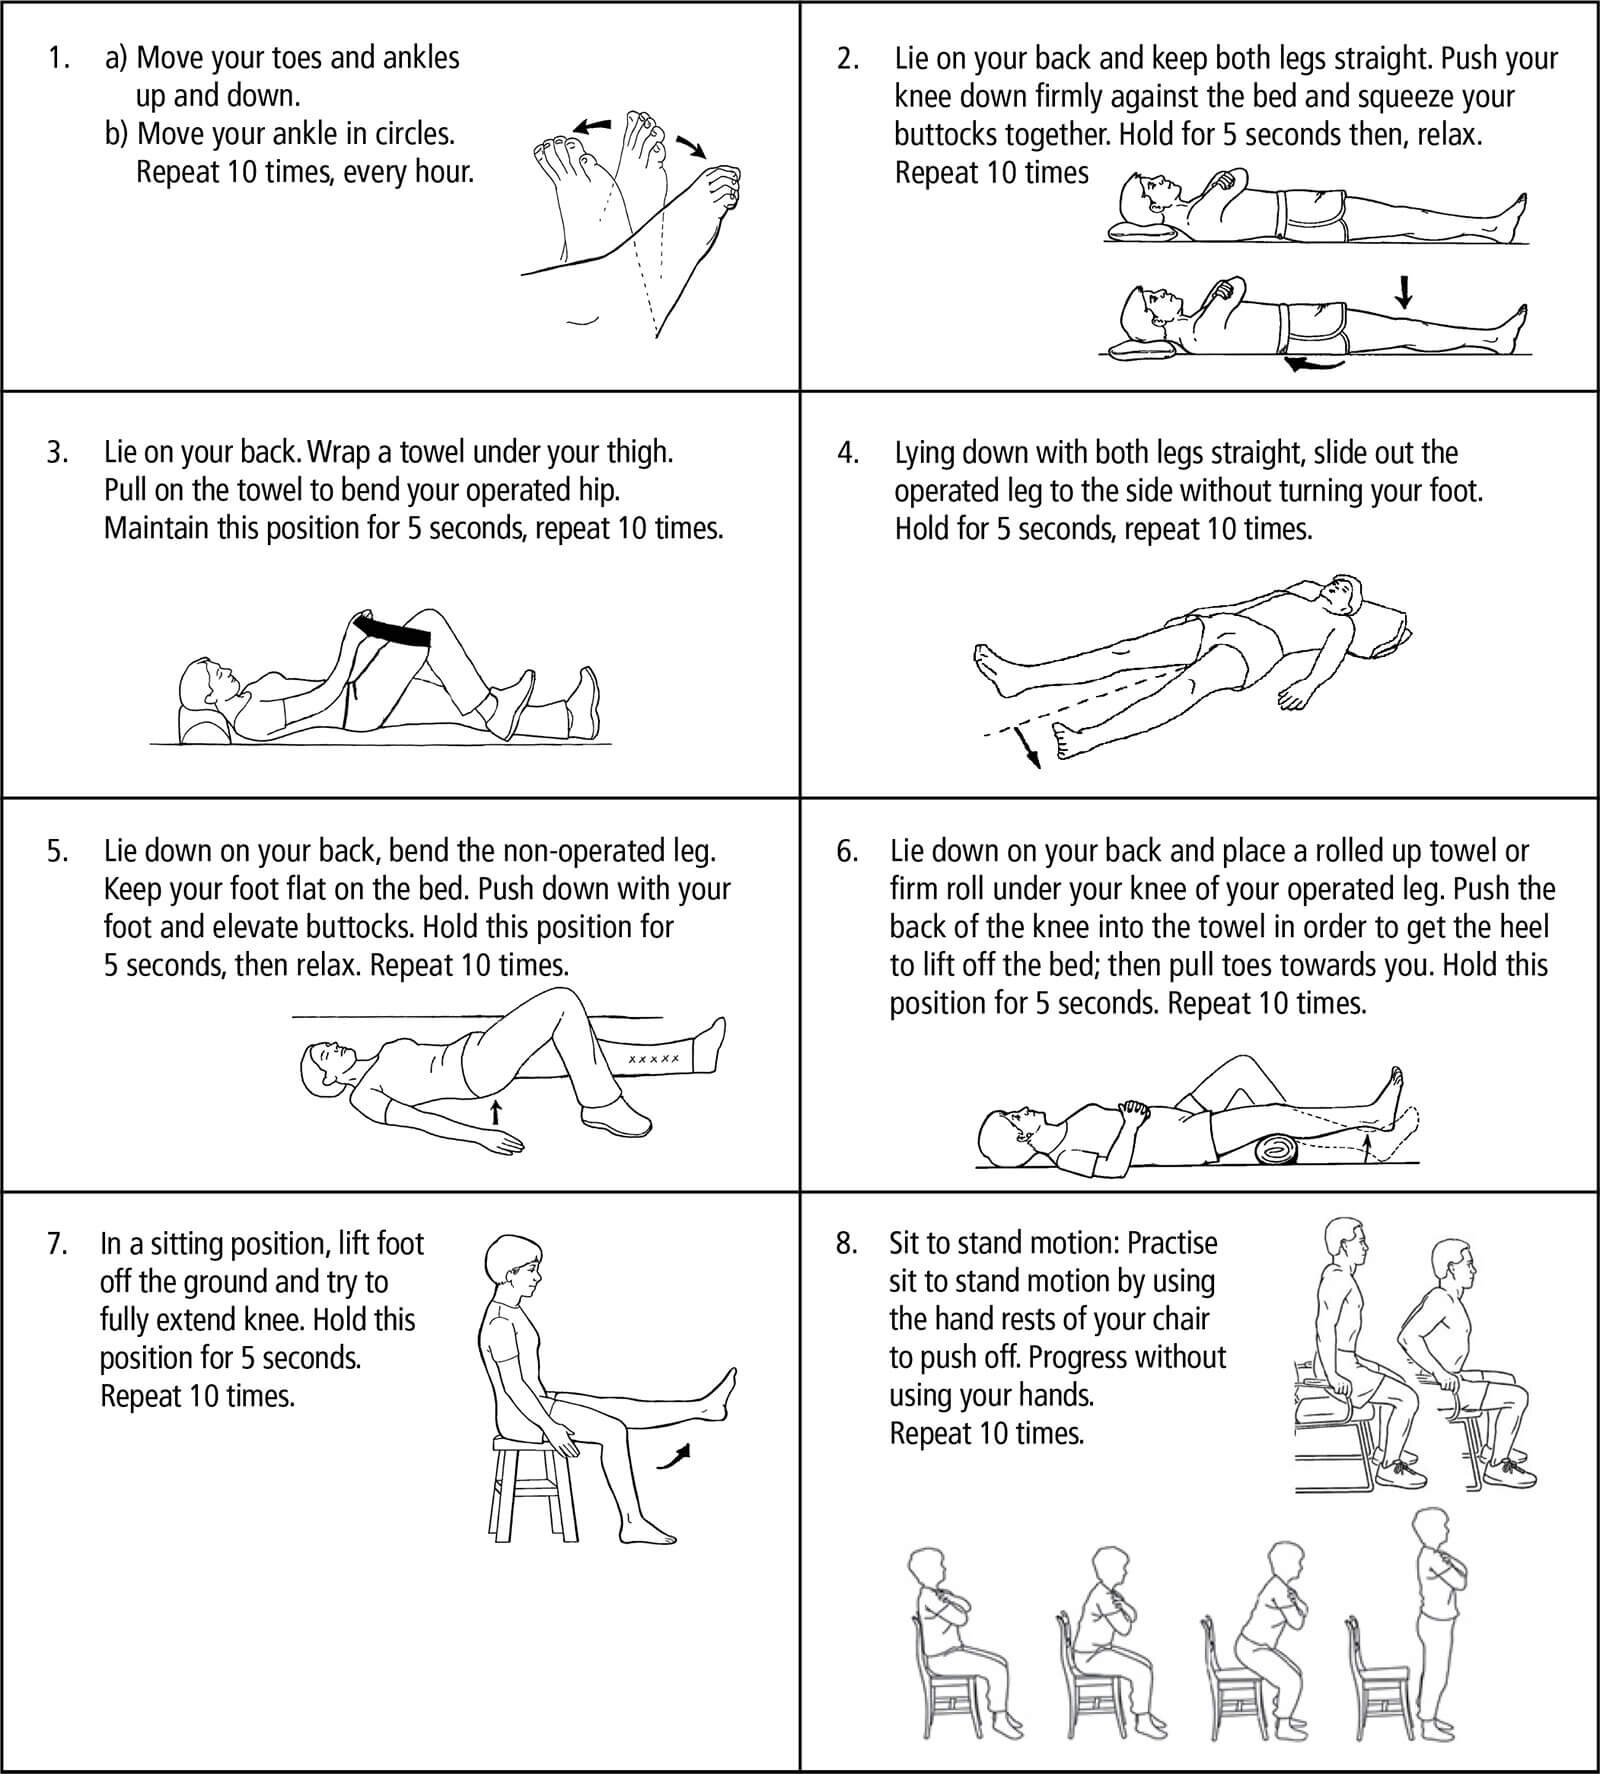
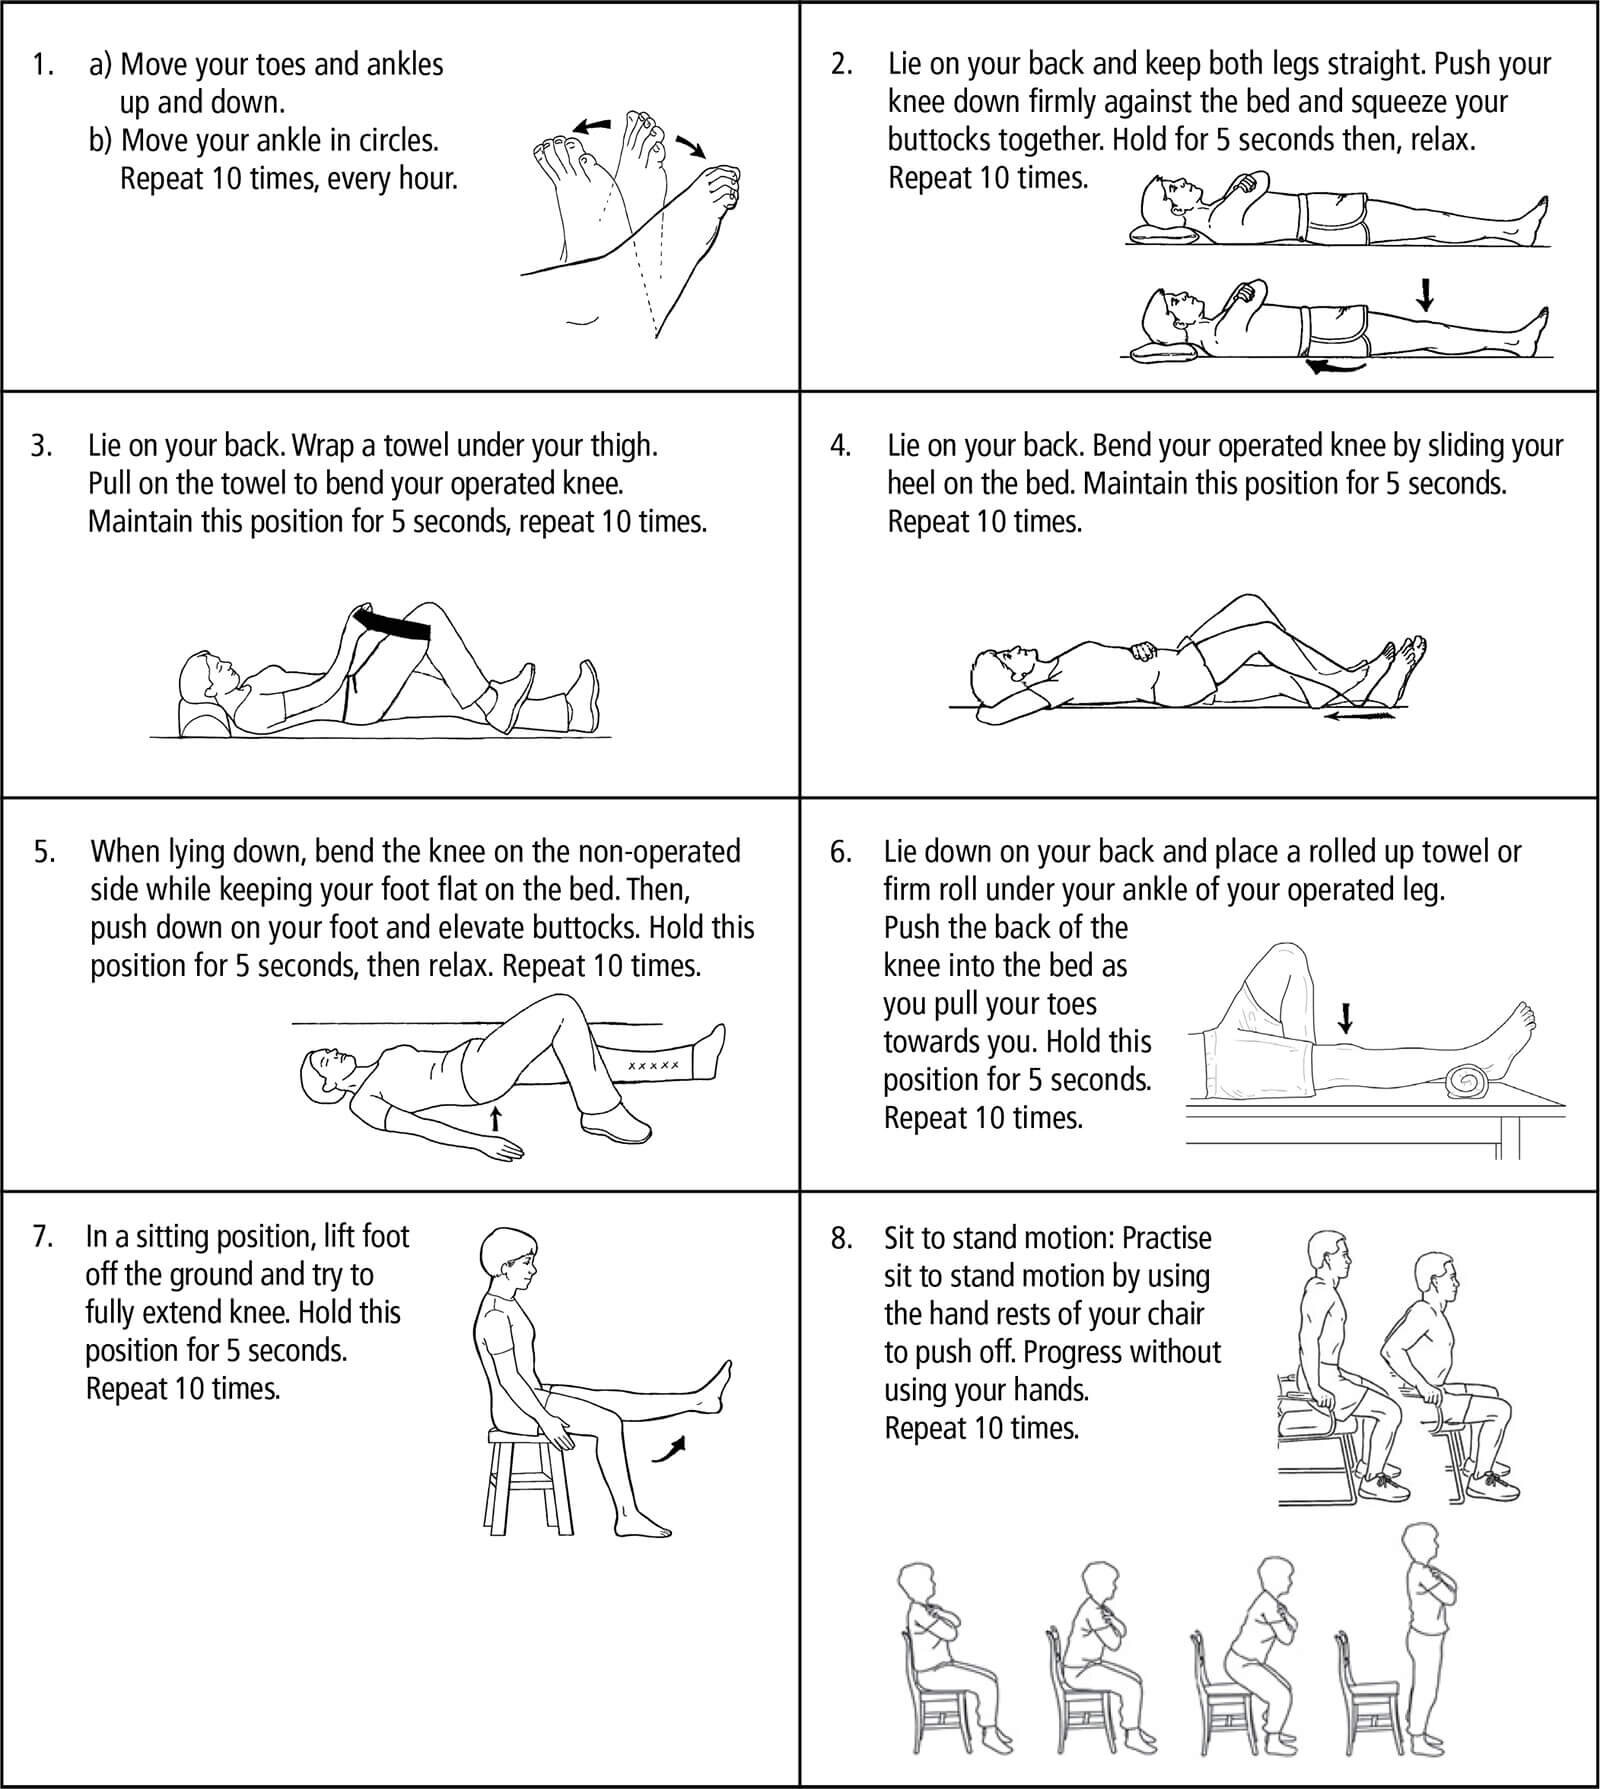
Exercises
Total Hip Replacement
Total Knee Replacement
Precautions
Precautions are necessary to prevent the new joint from dislocating and to ensure proper healing. These restrictions are for a period of 6 weeks.

Total Hip Replacement
DO NOT bend your hip past 90 degrees
DO NOT bend at the waist beyond 90 degrees (i.e. DO NOT try to pick up something from the floor while you are sitting or standing)
DO NOT bring your knee up higher than your hip
DO NOT cross your legs
DO NOT rotate your leg inwards

Total Knee Replacement
DO NOT put a pillow or roll directly under your knee, always keep the knee as straight as possible while in bed
DO NOT kneel or squat
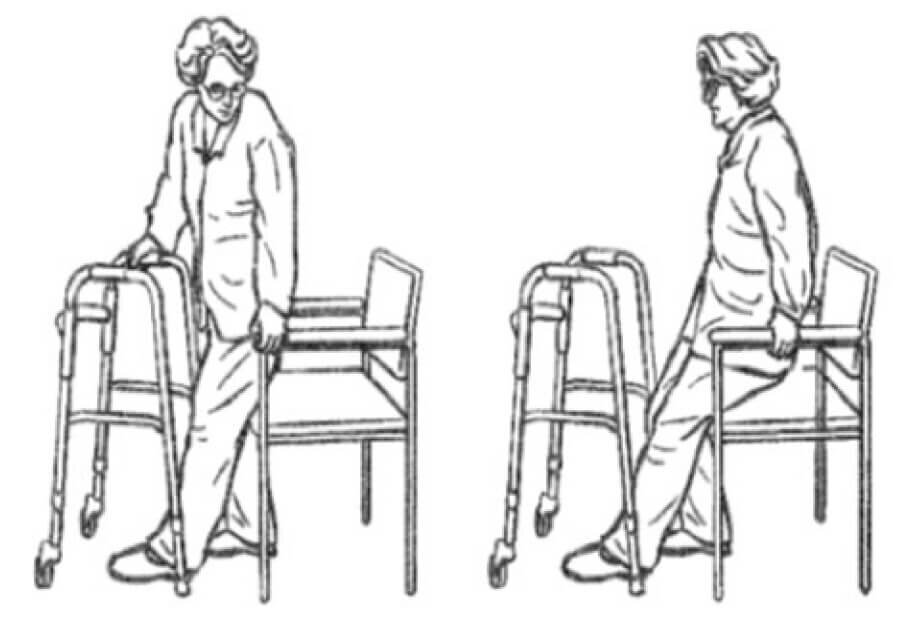
Getting Around After Surgery
WALKING WITH A WALKER
A walker is often used for the frst several weeks after your surgery.
Move walker forward
Take a step with your operated leg
Shift weight onto walker and take a step forward with the non-operated leg
DO NOT take sharp turns with a walker
WALKING WITH A CANE OR SINGLE CRUTCH
A cane or single crutch offers a minimal degree of support while walking. It is usually used for several months after the use of a walker until your full strength and balance have returned.
Hold cane or crutch in the hand opposite the operated leg

TRANSFERS (CHAIRS/ TOILETS)
To sit, slide the operated leg forward while holding onto the armrests and go down slowly.
To get up from the chair/toilet seat, bring your buttocks to the edge of the chair/toilet seat and slide your operated leg forward, pushing with your hands on the armrests. Get up slowly.
SITTING POSITION TO STANDING POSITION
Place hands on bed/armrests of chair.
Move buttocks to edge of bed/chair.
Slide your operated leg forward, pushing with your hands on the armrests.
Get up slowly.
Put your weight onto non-operated leg and push off with both hands from bed/armrests of chair.
Once standing, place your hands on walker and slide your operated leg back at the same level as non-operated leg.
STANDING POSITION TO SITTING POSITION
Use your walker for support as you back up until you feel the edge of bed/chair behind your knees.
Slide the operated leg forward.
Place one hand at a time on the armrest of the chair
Slowly sit down.
GETTING INTO BED
Position yourself close to the head of the bed.
Move back so the back of your knees touch the bed.
Slide your operated leg forward.
Place one hand at a time on the bed and slowly sit down.
Using your arms for support, start turning your body and lift one leg at a time.

GETTING OUT OF BED
Lying on your back, bend your non-operated leg and move yourself to the edge of the bed
Use your arms to push yourself up in a sitting position as you start turning your body and legs towards the floor
If needed, the therapist will assist your operated leg until it reaches the floor safely.
GOING UP STAIRS
Put the good leg up first
Bring up the operated leg and crutch or cane together
GOING DOWN STAIRS
First lower the operated leg and the crutch or cane
Lower the good leg using the crutch or cane
GETTING IN AND OUT OF THE CAR
Always sit in the front seat on the passenger side.
Ensure that the car seat is positioned as far back as possible so that you can straighten out your leg. Recline the back of the car seat.
Standing on the street (and not on the sidewalk), turn your back to the car and give your walker or crutches to your family member/friend.
Position yourself with your right hand on the back of the car seat and your left hand on the car dashboard.
Put your weight onto non-operated leg and push off with both hands from bed/armrests of chair.
Sit and keep your feet on the ground.
Slide your buttocks as far as you can on the seat.
Bring your legs into the car, use your hands or a towel underneath your thigh to lift your operated leg.
DO NOT attempt to swing your operated leg inside the car in one motion.
Follow the above steps in the reverse order to get out of the car.
Self Care
TOILETING
Use a raised toilet seat with or without armrests (A and B).
Use the armrests or grab bars to assist you when sitting down and getting up from the toilet.
DO NOT twist your body to reach the toilet paper or to flush.

DRESSING
Use a long-handled shoe horn (F) to put on and take off shoes
Use a sock aid (G) to put on socks or ask someone to put them on for you
Use elastic shoelaces that convert laced shoes to slip-ons; this eliminates excessive bending while tying a knot and bow
Use a long-handled reacher to help you put on and take off your pants and underwear; always begin with your operated leg when putting on pants and start with your non-operated leg when
taking your pants offWear loose and comfortable clothing
BATHING
Use grab bars to help you sit and stand.
Use a transfer bath bench (C), a bath seat with or without (D) back, or transfer bath board (E).
Use a long-handled sponge to reach your back and feet.


Home Instructions
MEDICATIONS
Ensure you understand the medications that your doctor prescribed.
Blood thinning medication – To prevent blood clots
Caution: Blood thinning medication may cause bleeding.
Pain medication – To control your pain so you can continue to walk/ physiotherapy
A good way to get pain relief is to take the pain medication as soon as the pain starts.
Pain medication taken by mouth takes at least 30 to 45 minutes to start working.
Caution: Pain medication may cause drowsiness.
LEG SWELLING
Most patients develop leg swelling in the operated leg. This varies from patient to patient and may be accompanied by “black and blue” bruising that resolves over a few weeks.
The more swelling you have, the more diffcult it will be to bend, straighten or even lift your leg. It is therefore important to minimize swelling to enhance your recovery.
To reduce swelling in the frst two (2) weeks:
Apply cold therapy to your joint frequently for 10- 15 minutes at a time.
After two weeks:
If you advance your activity too quickly or overdo it, your operated joint may become more swollen.
Here are some suggestions that will help reduce swelling if it occurs:
Move your ankles up and down (ankle pumps).
Ice for 10 – 15 minutes after long walks, if painful, or after exercise. Ice may be in the form of ice wrapped in bags or towels or commercial cold packs.
Lie in bed for 20 minutes periodically during the day.
Limit your sitting time to 45 minutes to one (1) hour. Walk around, then return to sitting.
Wear your support/ compression stockings as prescribed by your surgeon.
TRAVEL
Inform the airport security that you have a hip or knee implant. No medical certifcate or note by your surgeon is needed.
Modern airport security will detect all joint replacements. To minimize the inconvenience and avoid a full body pat down, you must go through the body scanner.
If you walk through the metal detector doorway, the alarm will go off and you will have to wait for a security agent to do a full body pat down.
REST PERIODS AND SUPPORT
Schedule rest periods throughout the day.
The CLSC will call you to plan their home visits.
Ensure that someone will stay with you for the first couple of nights.
SHOWERS AND BATHS
You may shower after your staples from your incision have been removed.
You may bathe one (1) week after your staples have been removed.
PREVENTING INFECTION AFTER A TOTAL HIP AND KNEE REPLACEMENT
Current guidelines DO NOT recommend routine antibiotic use for dental procedures. Antibiotics are recommended only in high risk patients. If you think you may be at risk, please discuss it with your doctor (the one who did your surgery) before any procedure.
FOLLOW-UP WITH YOUR DOCTOR
Post-operative follow-up is in 6 weeks at your doctor’s ofFIce where you saw him before your surgery.
Hip surgery: A hip x-ray is needed. Knee surgery: No x-ray is needed.
Resume driving when instructed by your doctor which is usually 4-6 weeks after your surgery.
RECOVERY AFTER SURGERY
You will likely feel tired and fatigued for several weeks and this is normal. You may experience numbness around your incision and this is normal. You may notice clicking: This is due to the plastic and metal surfaces moving together and this is also normal. The benefts of a joint replacement usually become fully evident by 4-6 months after the surgery.
Potential Complications
SURGICAL INCISION INFECTION
Signs of infection:
More redness or darkening of incision
Swelling
Chills
More pain
Fever
Foul-smelling or pus-like drainage from incision
If any of these symptoms occur, contact your doctor’s offce immediately or return to the Emergency Department.
BLOOD CLOTS
Signs of a blood clot:
Pain and/or redness in your calf
Increased skin temperature
Chest pain or pain when breathing
Increased swelling of your thigh, calf, or ankle
Shortness of breath
If you develop any of these symptoms, go to the nearest Emergency Department or call 911.